
15 BEST Media Server Software for Windows 10 PC (Free/Paid) in 2023
To stream with the best quality output possible, it is essential to choose the best settings for your video encoder. Changing quality settings to optimize streaming is easy with OBS Studio; just use the Video tab and Audio tab to configure these settings.
Your encoder is responsible for the audio output quality recorded from your external microphone and audio track. It also ensures the video output quality of your live streams is as high as possible, depending on the CPU usage preset.
Here are a few of the best OBS settings for streaming audio and video content, including the bitrate settings.
1. OVP-Specific Setting Requirements
Different online video platforms have different encoder setting requirements. That’s because each video or multi stream platform uses different technology to bring streams to life. Another reason is differences in requirements such as stream output quality, video resolution, and the built-in CPU usage preset in the broadcaster’s system. That’s why selecting your OVP according to your needs and desired output as a broadcaster is important.
Mslive, for example, has a few required OBS settings that apply to this and any other encoding software you may use.
These required live encoder settings include: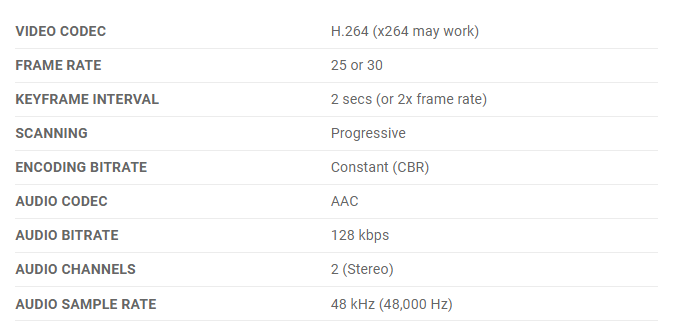
2. OBS Output Settings
To change your OBS Studio settings, you must open the “Output Settings“ in your OBS Studio account.
In the default settings, the selected output settings tab is selected as “Simple”. To optimize your OBS settings for streaming and to ensure your live stream is stable and fully functional we recommend you follow the configuration settings shared in the “Encoder Setup” window, pictured below:
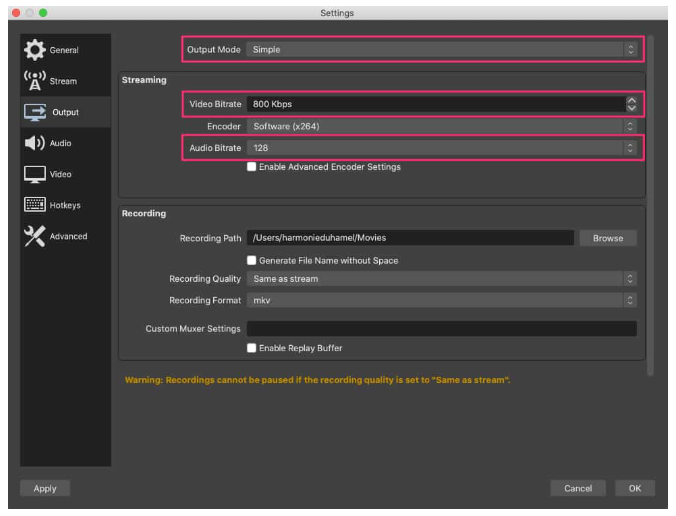
Customizing these settings through the video tab and audio tab will ensure higher video quality and audio quality for your stream. In this output mode, you only need to focus on the video bitrate and the audio bitrate to optimize output resolution.
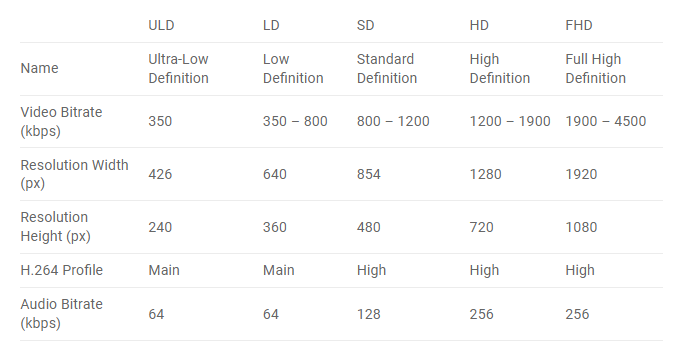
By default, the OBS audio bitrate and video bitrate settings will be in low definition. Here, you can control your stream quality by selecting the optimal video bitrate to broadcast high-quality video.
Our suggested video OBS bitrate settings for different resolutions include:
Let’s take a look at the audio settings now. You can easily customize these settings from the audio tab. You can add any audio device, such as desktop audio or external microphone. If you are only streaming audio, you can get away with OBS bitrate settings as low as 64 kbps. However, you should up your audio bitrate settings to 192-320 kbps for better audio quality output.
The higher the bitrate for your audio, the more crisp your live stream’s sound will be for the listeners. This is particularly important when they’re streaming videos in higher resolutions, and that’s why the audio bitrate needs to keep up with the video bitrate as the resolution increases.
We recommend downloading OBS Lua, which is an OBS-specific bitrate calculator. That’ll help you find the best OBS settings for your streaming needs.
3. Bitrate and Internet Speed
As you manipulate your bitrate settings, it is essential to consider your internet connection.
Your internet speed must be at least double your OBS bitrate if you want to produce a high-quality stream. Otherwise, you’ll run into buffering issues. Video quality isn’t the only element that defines the overall experience your content delivers to your viewers. Streaming with no buffering should be equally important as high video and audio quality output.
For example, if your internet upload speed is 2000 Mbps, then your OBS setting for streaming, audio, and video bitrates should not exceed 1000 Mbps.
You can search “internet speed test” on Google and click “RUN SPEED TEST” to test how fast your internet is.
Additionally, you can test your internet connection speed by going to the website testmy.net.
It’s equally important to consider your target audience when you’re determining the bitrate for your audio and video files. Are they going to watch your content on their smartphones or laptops? If they’re going to watch them while on the move, you might have to give them the option to lower the bitrates as their data speeds could fluctuate.
Alternatively, you can opt for adaptive bitrate streaming, which enables you to dynamically change the bitrate of your live stream based on the data speed of the viewer. This way, they won’t have to face prolonged buffering periods and will have a smooth streaming experience.
4. Advanced Output Mode
Advanced settings and rate control can also be accessed and changed through the output tab to produce better-quality streams. If you select the “Advanced” output mode, you’ll get access to more options for the best OBS settings. To ensure a quality stream output, you should use the following settings:
Pay close attention to ensure that your output mode is set to “Advanced”, the rate control is set as “CBR”, or constant bitrate, and the keyframe interval is equal to 3.
The other setting on the Output OBS Studio settings page relates to recording your broadcast. This feature enables you to record the live stream to a local drive as you stream.
We recommend enabling this setting if you haven’t set up an auto-archiving feature with your live streaming platform. Use “Same as Stream” or “Indistinguishable Quality” for recording quality, “mp4” for recording format, and “x.264” for the encoder.
5. Hotkeys
Hotkeys allow you to set up different scenes within your live stream encoding software. That way, you can switch between the scenes during your live broadcast.
How you configure your hotkeys will depend on your specific needs. For example, you could set up hotkeys for specific overlays and inputs.
There are several default hotkeys on OBS Studio, but they are turned off by default. You can check out the documentation for using hotkeys for streaming with OBS Studio on GitHub.
6. Video Sources
To add a video source, click on the “+” button in the “Sources” widget. You can select a display capture, video capture device, image, recorded video, etc. When you’re ready to stream live, click “Start Streaming”.
7. OBS Recording Settings
Recording streaming video and audio is a handy feature that lets broadcasters re-use live-streamed content with OBS Studio. Accessing this tool is very easy. Users must simply click “Start Recording” in the screen’s control panel in the lower right-hand corner.
To access your stream recordings, click “File” on the top left-hand side of the screen and choose “Show Recordings”. If you’re using Windows, it’ll send the stream recording directly to your computer’s “Video” folder.
Leave a Comment