
Read Frames from RTSP Stream in Python
For many B2C broadcasters, just about any software encoder will suffice. However, as a professional broadcaster, it’s important to consider updating to an encoder that supports RTMP streaming. RTMP stands for “real-time messaging protocol” and is a standard that makes high-quality live streaming possible.
In this article, we’ll get into the technical details of RTMP encoding.
First, we’ll discuss configuring an RTMP encoder and connecting it to a live streaming platform. Mslive is an authority on this particular protocol and has helped countless individuals and businesses stream live video using RTMP and other encoding standards.
After that, we’ll review top video streaming protocols and the most popular RTMP encoding software. It might seem complicated, and it is, but Mslive drastically simplifies the process. Keep reading to see how Mslive offers superior service and expertise.
This post has been updated to reflect the most accurate and up-to-date information regarding new features of each RTMP stream encoder’s latest versions released as of December 2022.
Configuring Your RTMP Encoder in 6 Steps
So you’ve decided which RTMP encoder to use and are ready to start live-streaming. To prepare for a smooth RTMP stream with minimal buffering, you must ensure all your RTMP settings are correctly configured. Whether you’ve decided on a software or hardware encoder, we’ve got you covered.
Here’s a 6-step walkthrough for configuring your RTMP stream encoder.
1. Connect Your Video Sources
Setting up your video-capturing equipment is an important step in broadcasting.
The first step is to connect your video sources. The method you use varies depending on whether you’re using RTMP encoder hardware or a software encoder.
If you’re using RTMP encoder hardware, the method is simple. Generally, hardware encoders have dedicated cable inputs for video cameras. These may include SDI inputs as well as HDMI.
For example, using an HDMI to RTMP encoder is generally a matter of plug-and-play. You typically just need to take the cord from your video camera and plug it into the physical RTMP device to start RTMP streaming. Additionally, some encoders support cameras via Wi-Fi. In that case, you need to sync the Wi-Fi signal of your device with the RTMP hardware to start streaming data.
A capture card is a physical device you plug into your computer, with a USB or HDMI connection. Then, you plug your camera into the capture card. Some capture cards allow you to capture images on your screen.
The method for connecting cameras to software encoders may be a little more complex. Generally, this involves installing a “capture card” on a desktop computer. Laptops and other devices can use external capture cards that often attach via USB.
Once your camera is physically connected to the encoder, it should be auto-detected. You can typically select it from a dropdown menu of “inputs.”
2. Create a New Live Channel and Connect Your OVP
The next step is to create a new live channel. That’s done via your OVP (online video platform). Usually, a video streaming platform will require your RTMP stream name and RTMP URL or stream key to configure encoder settings.
To complete this step with Mslive, follow these steps:
1. Log into your account.
2. Click “Live Channels” in the left-hand sidebar.
3. Click the orange “Create” button in the upper right.
4. Enter a title for your new live channel, then click “Add New”.
5. Click the “Encoder Setup” tab in the top-center of the screen
6. This tab shows three simple setup steps. The first step involves selecting a publishing point (optional) and selecting a bitrate, resolution, and aspect ratio (optional). The settings you select in your encoder will override these settings.
7. The second step allows you to select an encoder. Select the option that matches the encoder you’re using, or select “other RTMP encoder”.
8. Finally, on the right side of the window, a dialogue box will appear with a stream URL, a login, and a password. Leave this window open.
After creating your new live channel, you’ll need to link your encoder to Mslive via your stream key. That involves navigating your encoder settings, usually labeled as “Broadcast Settings” or “Output”. Enter your Mslive RTMP stream name, RTMP URL, stream key username, and password here. Your encoder is now connected to your online video platform.
3. Select Video and Audio Encoding Options
The next step is to select your video and audio settings. First, select an RTMP stream resolution, such as 1920 x 1080 (full HD) or 720 x 480 (standard definition). In this step, you’ll also select a bitrate and a codec. It’s widespread to use H.264 video compression, advanced video coding (AVC) for video, and AAC for audio.
Check out our walkthrough guide for more on setting up your encoder and choosing the best RTMP stream settings. To skip ahead and access the RTMP live encoder configuration settings, check out our recommended live encoder settings.
4. Get an Embed Code
At this point, we recommend you carry out a brief test stream. A test stream begins with embedding a video player on your website. Since this is just a test, you may wish to use a private webpage.
The exact method for embedding live streaming video to your website depends on the online video platform you’re using. If you’re using Mslive, we provide simple embed codes you can paste into any website to display your video.
5. Conduct a Test Stream
Now, you’re ready to begin a test stream. Head to the Mslive back office and hit the toggle switch to turn your live channel on. Then simply turn on your cameras and start recording. Since this is a test, it doesn’t matter what you’re streaming. Begin your live stream from the RTMP-enabled encoder you’re using to stream.
Visit the web page where you embedded your video player and look at how the stream works. Test it out with both a desktop computer and a mobile device.
If you’re having problems here, you’ll probably need to do some live stream troubleshooting. Troubleshooting can be frustrating, so try to be as systematic as possible. Check every link in the system. Ensure that cables are connected and that settings are correct. If you need more help, consider contacting Mslive technical support.
6. Start Streaming
You’ve now fully configured your RTMP streaming encoder and are ready to begin live streaming. Feel free to copy your video player to whatever web page or site you stream.
You are now ready to begin your live stream.
What is RTMP Streaming?
RTMP makes live-streaming possible, and its primary role is to deliver content from an encoder to an online video host.
RTMP streaming is a method that differs from its predecessors in that it maintains constant contact between the RTMP video player and the RTMP server. This constant connection makes an RTMP live stream very robust and reliable. Thanks to its adaptive bitrate streaming technology, RTMP has been essential for live streaming over the years.
How does RTMP Streaming Work?
RTMP, or real-time messaging protocol, works by keeping an open connection between the client and the RTMP server. Many consider RTMP streaming outdated since it was so closely intertwined with Adobe Flash Player technology, which has become deprecated for OTT streaming. However, RTMP live-stream technology lives on via RTMP streaming encoders. The RTMP standard helps encoders transmit audio and video data files.
It’s also possible to live-stream on mobile devices via RTMP ingestion to HLS. RTMP ingests the technology that transmits the video files from the encoder to media servers to the online video platform. It ensures your video files can stream with minimal buffering onto the viewer’s screen.
For years, Adobe Flash Player and RTMP streams worked hand-in-hand to produce ultra-low latency live streams. While RTMP streams are no longer used for last-mile delivery, they are still fairly common on the first-mile delivery front. In such cases, protocols, such as HLS and HTTP, step in for the last-mile delivery of the media data.
Common Video Streaming Protocols
Now that you’ve been introduced to RTMP live streaming and video live streaming encoders, let’s compare the most common video streaming protocols.
RTMP Streaming Protocol
Most encoders use the RTMP stream format. As mentioned, RTMP streaming is a delivery method designed for live streaming specifically. Simply put, the purpose of a live-streaming encoder is to encode video feeds into an RTMP stream or another video streaming protocol and send them out to an RTMP streaming server.
RTMP streaming protocol is not a codec, but an RTMP protocol commonly uses the H.264 codec, which supports 4K resolution. Any 4K RTMP encoder you use will likely be compatible with the H.264 codec, partly because the H.264 standard has been around for so long.
But also keep in mind that H.264 has a promising successor. HEVC RTMP encoders will grow in popularity because HEVC codecs arguably have more efficient compression mechanisms than H.264 codecs. However, you risk having compatibility issues because HEVC (also called H.265) is much newer than H.264. Most encoders use RTMP software with H.264 code for compatibility with other software and devices.
The RTMP protocol is no longer commonly used to deliver streams to viewers. Most often, a modern option like the HLS streaming protocol is preferred. Since RTMP is still the standard for delivering your streams to your online video platform, the two work together to make the magic of live-streaming possible.
To put things into perspective, your video follows this path:
1. Recorded by an RTMP-enabled IP camera
2. Fed to RTMP encoder and prepared for delivery using the real-time messaging protocol
3. Sent to your online video platform
4. Prepared for delivery to viewers using the HLS protocol
5. Sent to viewers
This path is traveled almost instantaneously. RTMP and HLS rely on one another to bring your live stream to your audience.
HLS Streaming Protocol
HLS stands for HTTP Live Streaming. It’s a streaming protocol that was originally designed and used by Apple. HLS is mostly responsible for the phasing out of Quicktime.
HLS works by chopping up videos into smaller clips to efficiently transmit them over the internet.
Although it’s praised for its compatibility, HLS has about 15 to 30 seconds of latency.
RTSP Streaming Protocol
RTSP is a live-streaming protocol that utilizes a server-to-client connection to stream video files to a video platform.
RTSP, also known as Real-Time Streaming Protocol, is a protocol for streaming video online, which has been around since 2002 (when Adobe Flash was the predominant video streaming format).
Known as a network-control protocol, this standard protocol was designed to control the streaming servers used in entertainment and communications systems. RTSP servers sit between the live stream and the viewer, issuing “play”, “pause”, and “record” commands.
When the RTSP controls the server-to-client connection, video-on-demand streams and live videos are used; when it controls the client-to-server connection, RTSP utilizes voice recording streams.
RTMP vs. RTSP
RTMP and RTSP are both streaming protocols, meaning they’re rules governing how video data travels from one communication system to another. Metaphorically speaking, if the video data you’re trying to send to your viewers is a car, then the streaming protocol is the roads the car takes to get from one place to another.
Choosing between RTMP and RTSP streaming protocols should mostly depend on your individual business needs and how many extra steps you’re willing to take to make your content playable on your website.
RTMP vs. HLS
As previously mentioned, RTMP and HLS as we know them today work together to bring streams to life. They have complementary functions.
RTMP streams the video from the encoder to the online video platform.
HLS transmits the video from the online video platform to the viewers’ devices.
It’s not a matter of comparing the two; they’re designed to work together. For example, Mslive uses RTMP for ingesting live streams and, from there, converts live-stream content to the HLS streaming protocol.
HLS vs. RTMP would’ve been more relevant in the past. But you’ll rarely hear streamers talk about RTMP as a delivery protocol anymore unless they’re talking in the past tense. When you hear streamers talking about RTMP today, they’re likely referring to RTMP in the sense of first-mile delivery or RTMP ingest.
Despite RTMP being a mostly phased-out streaming protocol, it has stuck around as RTMP ingest mostly because of the low latency streaming associated with the protocol. Another reason RTMP ingest continues to be popular is how readily available RTMP stream encoders are – you’ll rarely run into a compatibility issue with it. However, compatibility issues are quite common with HLS ingest.
Popular RTMP-Enabled Encoders for Live Video Streaming
Let’s review some of the more popular RTMP-enabled encoders available. If you’re in the market for an RTMP encoder for live streaming, this breakdown can help you narrow your options so you don’t necessarily have to shop around. We’ll start the list with a few software encoder options and finish off with some hardware encoder options.
1. OBS Studio
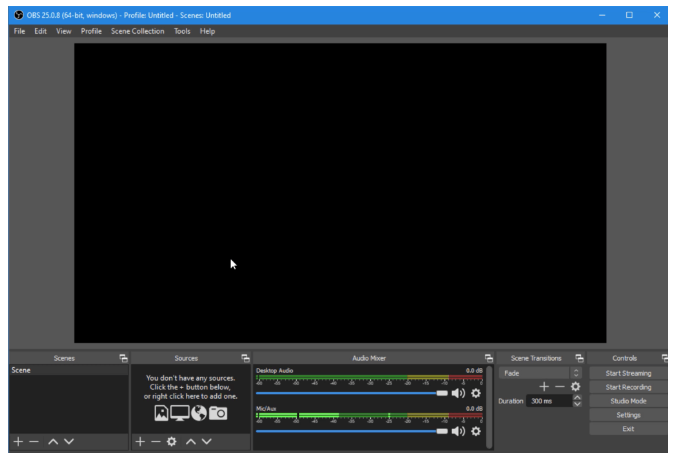
OBS Studio is free and open-source RTMP encoder software for video recording and live-streaming.
OBS Studio, previously known as Open Broadcaster Studio, is an open-source platform with encoding capabilities. This professional video streaming and broadcasting software is available for download here for macOS 10.13 or newer, Windows 8.1, 10, and 11, and Ubuntu 18.04 operating systems. For the Linux version, FFmpeg is required.
Mslive has partnered with OBS Studio to create custom live broadcasting software on OBS Studio that integrates perfectly with the Mslive platform.
Basic Functionality:
OBS Studio offers many great features for new broadcasters just getting the hang of live streaming. The software has a set of OBS-specific settings and system requirements to ensure the most optimal live broadcasting experience.
Key Features:
OBS Studio has various recording and encoding tools, including audio and video mixing, multiple integration options, and an easy-to-use interface. Other key features include
- HLS Live streaming and recording functionality
- Audio and video mixing, filters, and transitions
- Support for hotkeys
- Chroma key and green screen support
- Scenes allow you to prepare overlays in advance for rapid switching
- Support for a wide range of video, audio, and image sources, as well as screenshots
- Expandable via plugins to add NDI functionality, remote control via WebSockets, advanced scene switching, and more
- One notable negative is that OBS Studio doesn’t currently offer multi-bitrate streaming
- Detailed wiki and highly active user forum for support/help, and many YouTube tutorials are also available.
2. vMix
VidBlasterX offers professional broadcasters live video production, encoding, and streaming software solutions.
vMix is a streaming software tool with encoding capabilities designed for Windows operating systems. vMix was developed by StudioCoast.
The latest version of the Windows-specific software is 25.0.0.34 and includes an upgrade to a free 60-day trial of vMix PRO for download. While vMix 24 is for Windows only, the software can be installed on a Mac via Boot Camp if the machine has a Windows partition.
Basic Functionality:
vMix offers an array of video streaming tool plans. They offer a wide range of features at different price points, so there are options for broadcasters of every level of expertise. vMix offers powerful encoding services.
Key Features:
- Support for a wide range of inputs including webcams, cameras, capture cards, DVDs, sound cards, playlists, photos, PPT presentations, and more
- NDI support
- Chroma key and virtual sets
- Built-in titling tool that supports animation via XAML
- Live-streaming platform integrations (including with the Mslive streaming platform)
- vMix Social allows you to pull and display content from popular social media platforms
- Instant replay, slow motion, and scoreboards
- Training videos available
- vMix “reference systems” ease the difficulty around building a custom live production system
Conclusion
There’s always plenty to learn about video encoding. Many moving parts are involved in live-streaming live streaming, from RTMP and HLS to recording devices and OVPs.
Configuring an RTMP encoder requires many steps, but it doesn’t necessarily have to be confusing or complicated. While it can be overwhelming if it’s your first time streaming, the process becomes pretty simple with the proper tools and a little bit of direction.
Luckily, there are so many excellent encoding tools on the market, so finding one with the features that best suit your streaming needs shouldn’t be too big of an issue. Once you have the right tools, you can focus on creating quality live broadcasts that your audience will enjoy.
If you’re looking for an end-to-end live streaming video platform to host your live streams, look no further than Mslive.
Leave a Comment